Software Setup Step 1
This post documents Software Setup Step 1 in an AI model training workflow: turning a fresh Ubuntu machine into a reliable, reproducible PyTorch GPU training box—without creating future instability from mixed drivers, mixed CUDA components, or mixed Python environments.
The emphasis here is not “install things until it works once,” but build a clean, inspectable stack you can trust when training runs last hours or days.
Target outcome
By the end of this step, the system should satisfy the following checks:
- Linux + kernel stable and fully updated
- NVIDIA driver installed and loaded (
nvidia-smiworks) - Python environment isolated (venv, not system Python)
- PyTorch installed with CUDA support (not CPU-only)
- PyTorch sees the GPU (
torch.cuda.is_available()isTrue) - A real forward + backward + optimizer loop runs on the GPU
- A sustained load test runs ~60 seconds without CUDA/driver resets
- Evidence is captured (logs saved to disk for reproducibility)
System context
This setup was validated on:
- OS: Ubuntu 24.04.x LTS
- GPU: NVIDIA GeForce RTX 4070 SUPER
- PyTorch build: 2.10.0+cu128 (CUDA 12.8 runtime in the wheel)
- NVIDIA driver: 580.95.05
Step 1.1 — Capture a baseline (for reproducibility)
Before changing anything, record the “known starting point.” This becomes your reference if a later kernel update, driver upgrade, or library change breaks training.
Typical baseline items:
- Ubuntu release + kernel version
- GPU PCI details
- Secure Boot state (if applicable)
- Current driver/tool versions (if any)
Step 1.2 — Fully update Ubuntu
A partially-upgraded system is a common root cause of driver module failures.
Run:
sudo apt update
sudo apt full-upgrade -y
sudo apt autoremove -y
sudo reboot
Why this matters: NVIDIA drivers install kernel modules. Kernel modules and headers must match the running kernel, and upgrades reduce “mystery failures” later.
Step 1.3 — Install prerequisites
Install core build tooling and Python environment support:
sudo apt install -y build-essential python3-venv python3-pip linux-headers-$(uname -r)
Why this matters:
- Some Python packages compile native extensions.
- Driver modules are sensitive to kernel headers.
python3-venvis non-negotiable if you want isolated, reproducible AI environments.
Step 1.4 — Install the NVIDIA driver (Ubuntu-managed) and verify
Install (Ubuntu-supported method)
Using Ubuntu’s recommended mechanism (instead of NVIDIA’s .run installer) tends to survive kernel upgrades more cleanly and avoids “mixed library” states.
Verify (driver is loaded and GPU is visible)
Core check:
nvidia-smi
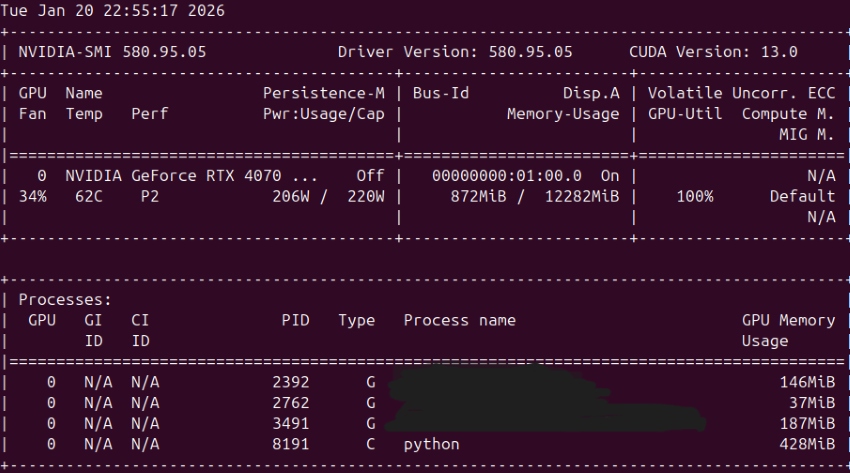
Verification snapshot:
- Driver Version: 580.95.05
- GPU correctly listed: RTX 4070 SUPER
- During compute: GPU-Util ~100%, power draw elevated, and a python process shown as Type C (compute)
That is the most practical “is it really using the GPU?” proof.
Important nuance: CUDA Version in nvidia-smi
Your nvidia-smi output shows something like CUDA Version: 13.0. This does not mean you installed CUDA Toolkit 13.0.
It means: the installed driver supports CUDA up to that version.
PyTorch can still run perfectly using its own packaged CUDA runtime (here: cu128, CUDA 12.8). That combination is normal and compatible.
Step 1.5 — Create a “golden” isolated Python environment (venv)
Create and activated a dedicated environment:
python3 -m venv ~/ai/envs/torch
source ~/ai/envs/torch/bin/activate
Verification habit (highly recommended):
which python
python -c "import sys; print(sys.executable)"
Confirm the correct interpreter path:
/home/XxXxXxX/ai/envs/torch/bin/python
This matters because most early training failures are not “CUDA problems”—they’re the wrong Python running the script.
Step 1.6 — Install PyTorch with CUDA support (cu128)
Install a CUDA-enabled PyTorch build (not CPU-only). The key evidence:
torch: 2.10.0+cu128
That +cu128 suffix is the giveaway: it’s a CUDA-enabled wheel.
Step 1.7 — Verify PyTorch can see the GPU
Run a minimal hardware visibility script:
python - << 'PY'
import torch
print("torch:", torch.__version__)
print("torch.version.cuda:", torch.version.cuda)
print("cuda available:", torch.cuda.is_available())
if torch.cuda.is_available():
    print("gpu:", torch.cuda.get_device_name(0))
PY
The output confirmed:
torch: 2.10.0+cu128torch.version.cuda: 12.8cuda available: Truegpu: NVIDIA GeForce RTX 4070 SUPER
At this point, the core GPU software stack is functional.
A small dependency hiccup that looked scarier than it was
Failed to initialize NumPy: No module named 'numpy'
This is not a GPU issue. It simply means NumPy wasn’t installed inside the venv yet.
Fix:
python -m pip install -U numpy
Step 1.8 — Run a GPU training smoke test (forward/backward/optimizer)
A proper smoke test proves the entire training loop works on GPU:
- model forward pass on GPU
- loss computed on GPU
- backward pass on GPU
- optimizer step works
- timing uses CUDA sync (so you’re measuring real GPU work)
Script also included practical runtime diagnostics like:
print(f"GPU mem allocated: {torch.cuda.memory_allocated()/(1024**2):.1f} MiB")
print(f"Steps: {steps}, batch: {batch}, time: {dt:.3f}s, steps/s: {steps/dt:.2f}")
And a defensive early exit:
raise SystemExit("CUDA not available. Fix driver/PyTorch before proceeding.")
That “fail fast” pattern is valuable: it prevents wasting time debugging downstream symptoms when the root cause is simply “no CUDA.”
Why the first run finished “too fast”
You expected something like “60 seconds,” but the initial smoke test completed in milliseconds. That’s normal if the script runs a fixed small number of steps. It still did its job: prove correctness.
Step 1.9 — Run a true 60-second sustained load test (stability/thermals/power)
The sustained test is about reliability, not correctness:
- continuous compute load
- GPU stays stable under heat and power draw
- no driver resets
- no CUDA errors after many iterations
The run produced:
- ~60 seconds runtime
- steady throughput (steps/second)
- modest GPU memory allocation (tens of MiB)
nvidia-smishowed high utilization and a compute process
That combination is exactly what you want before attempting real training workloads.
The “problems” I hit were environment issues, not CUDA failures
These are classic early-stage issues and worth documenting because they recur:
1) Ubuntu has python3, not always python
On many Ubuntu installs, python is not present by default. So scripts that assume python can fail with Command 'python' not found.
Reliable fixes (choose one):
- Always run
python3outside a venv - Prefer the explicit venv interpreter:
~/ai/envs/torch/bin/python your_script.py - Optional convenience package:
sudo apt install -y python-is-python3(Only if you wantpythonto point topython3system-wide.)
2) ModuleNotFoundError: No module named 'torch'
Almost always caused by running the script with the wrong interpreter (system Python instead of the venv). The “never wrong interpreter” habit prevents this.
Capture the working state (so you can always rebuild it)
You already started doing this with nvidia-smi | tee .... Keep going—this is how you make the setup reproducible.
Recommended snapshot commands:
source ~/ai/envs/torch/bin/activate

pip freeze | tee ~/ai/bootstrap/pip_freeze.txt
python -m torch.utils.collect_env | tee ~/ai/bootstrap/torch_collect_env.txt

nvidia-smi | tee ~/ai/bootstrap/08_nvidia_smi.txt
uname -r | tee ~/ai/bootstrap/kernel.txt
This creates a “known-good” record you can compare against after upgrades.
What’s next: Software Setup Step 2 (turn the machine into a training platform)
Now that the GPU stack works, the next step is to eliminate “project chaos” before real experiments start.
Software Setup Step 2 goals
- Project skeleton that prevents drift
- Reproducible runs (configs, seeds, saved environment)
- Logging + metrics (loss curves, throughput, GPU stats)
- Data pipeline sanity (dataset loading, batching, pinned memory)
- A baseline model you can compare against
A practical Step 2 outline
2.1 Create a clean repo structure
Example:
ai-project/
  configs/
  src/
  scripts/
  runs/
  data/            # ignored
  README.md
  .gitignore
2.2 Make “the right python” the default
Adopt a standard run command:
~/ai/envs/torch/bin/python -m src.train --config configs/base.yaml
2.3 Add experiment logging
Pick one:
- TensorBoard (simple, local)
- Weights & Biases (excellent for long-running comparisons)
2.4 Add monitoring during training
Track:
- steps/sec
- GPU utilization and memory
- temperature and power (optional but useful)
2.5 First real baseline experiment
Start with a tiny dataset and a small model to validate:
- dataloader correctness
- overfit a small batch (debugging gold standard)
- save/load checkpoints
- confirm determinism (seed control)